Safety & boundaries
Garage Door Safety Inspection Checklist for Homeowners
By Omar, Factory-Trained Technician· Updated 2026-06-20
A garage door safety inspection is a short routine that confirms the door is balanced, the auto-reverse works, the cables and springs look sound, and the moving parts are clean and lubricated. Run the 12 points below twice a year, and leave springs, cables, and brackets to a professional.
What does a garage door safety inspection cover?
A garage door safety inspection covers the parts that fail or cause injury: the springs and cables that carry the weight, the rollers and tracks that guide the door, the auto-reverse and sensors that protect people, and the seals and hardware that keep it tight. You inspect the safe parts and watch the dangerous ones.
The goal is to catch a worn roller, a frayed cable, or a failing sensor before it becomes a door that drops, jams, or refuses to open on the coldest morning of the year. Most of this checklist takes fifteen to twenty minutes with no tools beyond a stepladder, a wrench, and a can of the right lubricant. A handful of items, the springs, cables, and bottom brackets, are look-only, because they store enough energy to break bones. For the full picture of where the DIY line sits, read the complete garage door safety guide.
Prefer a pro to do it for you? A professional garage door tune-up and safety inspection covers all 12 points plus a spring-life and balance check, with the $35 to $85 service call applied free to any repair over $250.
The 12-point homeowner garage door safety checklist
The 12-point checklist runs in order: watch a full cycle, test the balance, test the auto-reverse, inspect the cables and springs, check the rollers and track, inspect the seals, lubricate the metal parts, then tighten the hardware. The first eight items below are the hands-on core; items 9 to 12 are the pro-only watch points.
Work top to bottom and write down anything that looks off. You are building a small history of your own door, which makes it obvious when something changes between inspections.
1. Watch and listen to a full open and close cycle
Stand inside, run the door through one complete open and close cycle, and watch and listen. A healthy door moves smoothly and quietly, with no jerking, grinding, popping, or scraping, and both sides rise and fall evenly. Note exactly where any odd noise or hesitation happens.
Grinding usually points to dry or worn rollers and hinges, a loud bang often means a spring has snapped, and a rhythmic squeak that tracks the door’s travel is almost always a dry roller. If the door hitches at one spot, the track is likely bent there. A door that runs rough here tells you which later items deserve a closer look.
2. Test the door balance (the manual lift test)
Close the door, pull the red emergency release cord to disconnect the opener, and lift the door by hand to about waist height, then let go. A balanced door holds its position. If it slides down or springs upward, the spring tension is wrong and the door is not balanced.
An unbalanced door forces the opener to fight gravity, which burns out the motor and wears the gears early. Lift slowly and keep your fingers off the section joints and the bottom panel. This is a safe homeowner test, but the fix is not: adjusting torsion springs is a job for a technician because the springs are under thousands of pounds of force. If your door fails the balance test, book a professional garage door tune-up and safety inspection rather than touching the spring yourself.
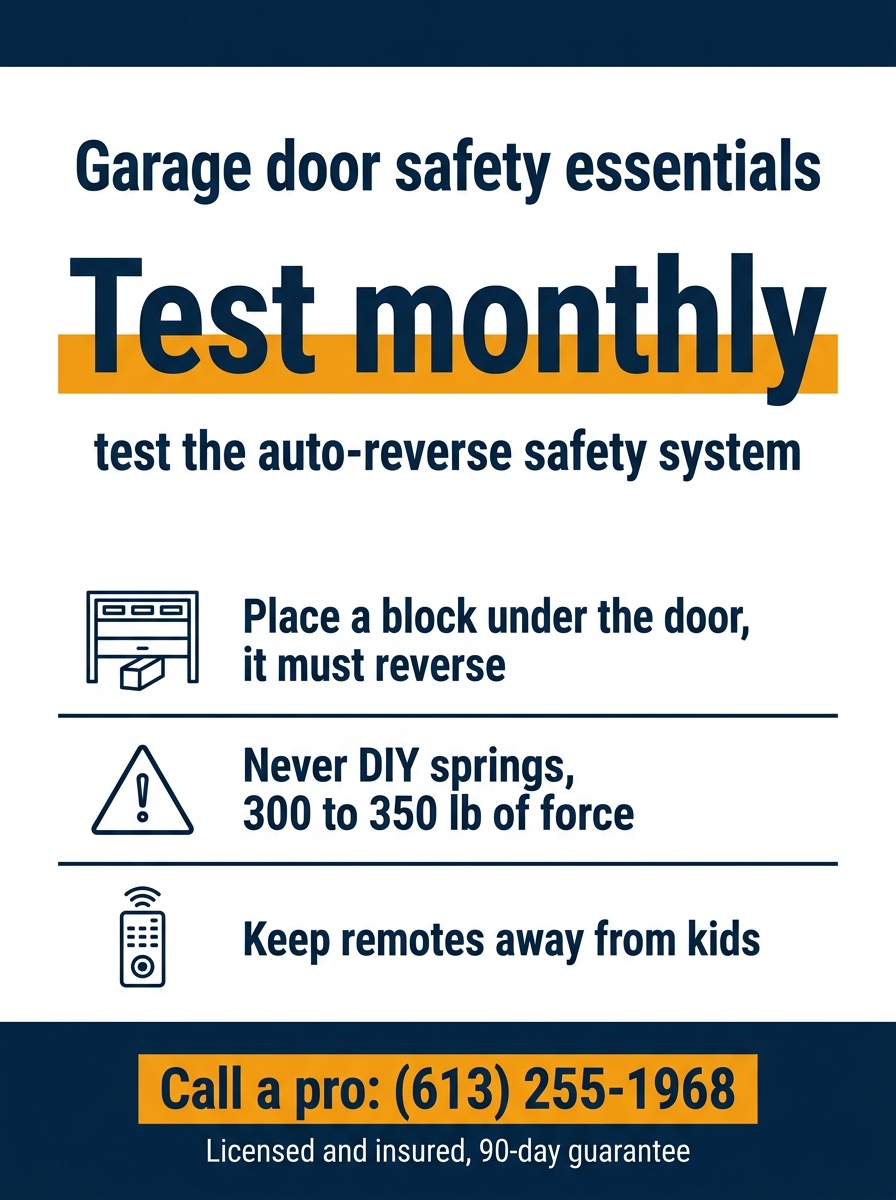
3. Test the auto-reverse and photo-eye sensors
Run two tests. First, lay a flat 2x4 board on the floor under the door and close it; the door must reverse the moment it touches the wood. Second, close the door and break the photo-eye beam near the floor with your foot; the door must stop and reverse immediately.
Federal law has required both systems on every new opener since 1993: a contact-reversal mechanism and a pair of photo-eye sensors about six inches off the floor. If the door does not reverse off the board, or does not stop when the beam is broken, stop using the opener until it is fixed, because that door can crush a child or pet. Wipe the sensor lenses with a soft cloth and confirm both indicator lights glow steady. For the step-by-step version, follow how to test your garage door auto-reverse and sensors.
4. Inspect cables, springs and the bottom bracket (look, do not touch)
Look only, never touch. With the door closed, visually inspect the lift cables for fraying, rust, or loose strands, the torsion spring above the door for any gap or break in the coil, and the bottom brackets at each corner. These parts hold the full weight of the door under extreme tension.
A torsion spring stores enough energy to break a hand, and a snapped cable whips with force that can cause serious injury, which is exactly why these are the never-touch items. A frayed cable, a visible gap in the spring coil, or a bracket pulling away from the door all mean stop using the door and call a technician. Cables and springs are not a DIY repair at any skill level; read why springs and cables are the never-touch items, then book garage door cable and roller repair if you spot damage.
5. Check rollers, hinges and track alignment
Inspect each roller, hinge, and the vertical and horizontal tracks. Rollers should spin freely with no flat spots, chips, or wobble; hinges should be tight with no cracks; and the tracks should be straight, plumb, and free of dents. A worn nylon roller or a bent track makes the door bind and jump.
Most builder-grade doors ship with noisy steel rollers; upgrading to sealed nylon rollers cuts the noise and lasts longer. Sight down each track from top to bottom to check it is parallel to the door, and look for shiny spots or debris where a roller is dragging. Do not loosen the track brackets to adjust alignment yourself, because a track that shifts under load can let the door come off its rails. If a roller is shredded or a track is dented, that is a service item, not a lube fix.
6. Inspect the weather seals and bottom gasket
Check the bottom rubber gasket and the seals along the sides and top of the door. The bottom seal should be flexible and seat flat against the floor with no gaps, tears, or hardened sections. In Ottawa winters a cracked bottom seal lets meltwater under the door, where it refreezes and bonds the door to the concrete.
Run your hand along the bottom astragal and flex it; rubber that is stiff, split, or flattened no longer keeps out drafts, water, or pests, and it is the main reason a door freezes to the slab overnight. Side and top seals keep the same weather out at the edges. A bottom seal is one of the few parts a confident homeowner can swap, but if you are unsure, add it to the tune-up list. A good seal also keeps your garage warmer, which protects the springs from the worst of the cold.
7. Lubricate the moving metal parts
Lubricate the springs, rollers, hinges, bearings, and the top of the rail with a white lithium grease or a silicone-based garage door spray. Wipe off old grime first, apply a light coat to each pivot and the spring coils, then cycle the door twice to work it in. Never use WD-40.
WD-40 is a degreaser, not a lubricant; it strips the protective film and leaves the parts dry within weeks. Use a proper garage door lube on every metal-to-metal contact point, but keep it off the plastic idler and the photo-eye lenses. Done twice a year, this single step is the biggest noise reducer and life-extender on the list, and it is completely safe to do yourself.
8. Tighten the visible hardware
Vibration from hundreds of open and close cycles loosens bolts over time. With a socket or wrench, snug up the visible hardware: the hinge bolts, the roller brackets, the track fasteners on the wall and ceiling, and the lag bolts holding the opener bracket and rail. Tighten firmly, but do not overtighten and strip the threads.
Leave one set of fasteners alone: the bolts on the bottom brackets and the spring hardware. Those carry the cable tension and are part of the never-touch group from item 4. Everything else that secures a hinge, a roller, or the track or opener mount is fair game, and a few minutes with a wrench keeps the door from rattling itself loose.
Which checklist items need a professional?
Four items need a professional: the springs, the cables, the bottom brackets, and any track adjustment that bears load. These store or carry enough force to cause serious injury, so the homeowner job is to look and report, while a factory-trained technician does the hands-on work with the right tools and clamps.
You can safely lubricate, run the balance and auto-reverse tests, clean sensors, check seals, and tighten ordinary hardware. The moment a test fails, a cable frays, a spring shows a gap, or the door comes off its track, the job crosses the line into why springs and cables are the never-touch items. HUSH’s owner Omar is a factory-trained technician, the company is licensed and insured, and every job is backed by a 90-day Done-Right Promise. If your inspection flagged a cable or roller, that is a garage door cable and roller repair, and we carry the parts on the truck. Call (613) 255-1968 if anything on the look-only list looks wrong.
How often should an Ottawa garage door be inspected?
Run the homeowner checklist twice a year, in spring and fall, and book one professional tune-up annually. A door used four times a day logs about 1,500 cycles a year, and most springs are rated for roughly 10,000 cycles, so a typical door reaches end of spring life in six to seven years.
More cycles mean more frequent service. A busy household that runs the door eight or more times a day should inspect every three to four months and tune up once a year without fail. Catching a tired spring or a worn roller during an inspection turns a surprise breakdown into a planned, cheaper fix. We provide tune-up service across Ottawa and Gatineau, so a professional visit is never far off when your checklist turns up something you would rather not handle.
Why winter is the season to inspect
Inspect before the first cold snap. Cold weather is when worn springs snap, because steel becomes brittle and metal fatigue catches up below freezing. A fall inspection catches a tired spring, a cracked bottom seal, or stiff lubricant before December, when a failure leaves your car stuck in the garage on the coldest morning.
Pay special attention in fall to the balance test, the bottom seal, and the lubricant, since those three decide whether your door survives an Ottawa winter. A flattened seal lets the door freeze to the slab, dry lube seizes in the cold, and an unbalanced door overloads the opener against frozen, stiff parts. Beat the first cold snap and book your fall inspection while the weather is still mild.
Book a professional tune-up and safety inspection
Book a professional tune-up and safety inspection to have all 12 points checked by a technician, plus a spring-life measurement and a precise balance adjustment. The $35 to $85 service call is free when applied to any repair over $250, the rate is flat with no overtime fees, and the work carries our 90-day Done-Right Promise.
A HUSH visit covers everything on this checklist and the parts you should not touch: spring tension, cable condition, and bracket integrity, all measured and adjusted by a factory-trained technician. We are licensed and insured, and we come to you anywhere across Ottawa and Gatineau. If your own inspection turned up a noise, a failed test, or a worn seal, book a professional garage door tune-up and safety inspection online, or call (613) 255-1968 and we will get a technician to your door.